|
First: What is a direct box and why is it used:
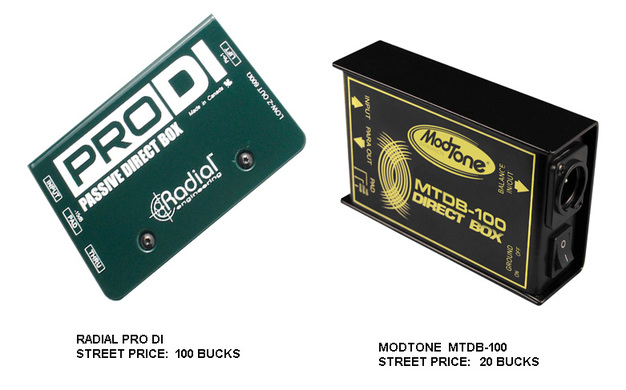
A direct box or (DI) is used when you need to send an unbalanced signal; most commonly bass, electric acoustic guitars or keyboards direct to your mixing board. Typically these instruments have unbalanced ¼” outputs. On a typical stage the Drums and guitar amps will use microphones to carry their sound to the front of the house mix while the aforementioned instruments will most likely run direct to the mixer. Without a DI you would be running hi impedance instrument cables to the mixer and that can present problems. Of these problems these three are the most common: #1. These unbalanced cables can pick up unwanted noise and inference, also the longer the cable run, the more likely this becomes. A good direct box eliminates the “hum” or noise by balancing the signal. #2 . Because a Di takes a ¼” unbalanced cable (and signal) and it converts it to a balanced signal via 3-pin connector Microphone cable and carries your signal to the mixer, you should use a DI if your cable is longer than 20 feet; the low-z balanced mic cable will carry your signal extremely far without degradation. #3. Most DI’S offer pad and loop features –the pad feature helps make sure you sound isn’t distorting because it’s too loud before it ever even gets plugged in to the mixer (not all mixers start at the same volume) , and the loop helps you monitor yourself directly on stage or duplicate the signal for things like recording, or amplifying in yet another location! So, in short most direct boxes allow you to: Avoid unwanted noise, send a nice strong signal far away, avoid that signal clipping when it gets there, and duplicate that signal so that it can be in two places at once! They are a tool every musician should have in their gig survival kit. See the Modtone See the Radial
6 Comments
Ever wonder if you would be better off with a Clip On Vibration tuner versus a Pedal Tuner or vice versa? Here we will discuss the pros and cons.
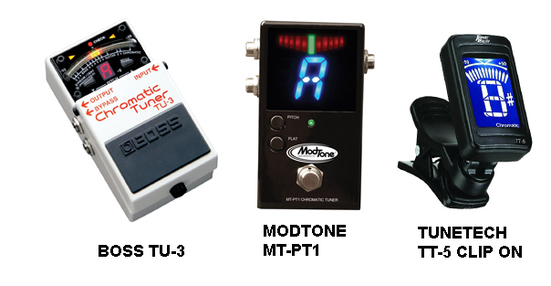
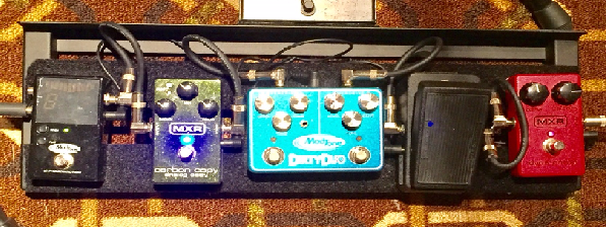
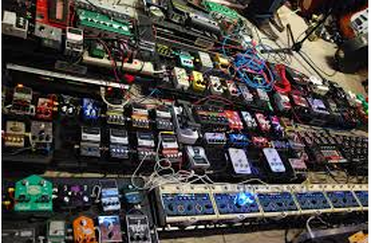
Clip On Tuner There are plenty of affordable, easy to use and reliable clip on vibration tuners available. They work by picking up the vibrations of your guitar at the head-stock via a sensor and a simple spring loaded clip with protective pads. A low cost favorite is the Tune Tech TT-5. It can be had for about $14.95. Like most tuners of this type it has 5 modes for tuning of Guitar, Bass, Ukulele, and Violin as well as a full chromatic function. It also features a 360 degree swivel and a Back Lit LED screen that changes color when your instrument is in tune and uses an easily accessible common variety Lithium battery. Pros: low cost, battery powered, easily switches from one instrument to another, fits in guitar case, gig bag or your pocket, saves you space on your pedal board. Cons: Can be inconvenient if the battery dies during a show and can become dim hours prior and can be easily lost or stolen. May be hard to read in sunlight, can be delicate if you’re prone to bumping into things, like other guitar players. Pedal Tuner Floor Pedal tuners Offer several advantages over clip on tuners. While more costly than their portable cousins, there are well made affordable ones available. The Modtone MT-PT1 can be purchased under $40.00 retail. The PT-1 Chromatic Tuner features an easy to read multi-color LED display, has a bright blue note readout with green in-tune markers, it tunes quickly and accurately. The MT-PT1 also features a heavy duty metal housing, ¼” input, and dual ¼” outputs. Use the second Bypass output to run a stereo rig or send your signal direct to the board. The Pitch button allows for fine tuning up or down 5 cents. The Flat button allows for de-tuning three half-steps (Eb, D, Db). The Boss Tu-3 tuner offers special modes for 6 string basses and 7 string guitars and be used as a power supply for 7 more Boss pedals and can be had for about $100.00 retail. Pros: AC/DC powered, permanently mountable on your pedal board, large easy to read display, can be used as kill switch for your signal Chain. Can be used inline or in a bypass mode. Some models can be used to power other pedals. Cons: If you are doing an acoustic gig and want to bring a minimal amount of gear, a Clip On tuner may make more sense. Conclusion: So what’s the verdict? You probably need both. If you are like most guitarist’s you have or have had, more than a practical amount of guitar effects at one time or another. Like most sufferers of GAS (Gear Acquisition Syndrome), I have more than my share. I have found that part of the allure of effects is the constant research, demos, forums etc that bind our infectious community together. The result for me is an ever growing amount of pedal boards for specific task’s because for us, let’s face it, one board is simply not enough! In my Music "Man Cave", I have at my disposal a plethora of guitars, effects and amps (just like I’m supposed too.) I can entertain myself for hours just copping the tones of my favorite artists. But what about when it actually comes time to play a gig? It only took a few times of tearing apart my home rig and hauling a massive pedal board around before I began to think in terms of efficiency and economy. So then the question of “what pedals do I really need to pull off an average gig?” needed to be answered. Don’t get me wrong, I have no intention of parting with any of my beloved effects, after all, the possibility that some one of interest, “say, Jeff Beck” for instance; may call me for a gig some day and I will need every single one of them! Until then I offer this line up as the sacred 5, all which fit nicely on a small, 1 row pedal board. 1# Pedal Tuner: Let’s start here, I play in standard tuning as well as open G, open E and drop D, and while I usually bring extra guitars, I still do a lot of retuning. I wouldn’t leave home without it. #2 Overdrive: I have used 1 overdrive many times and varied my gain with the guitar volume knob, but I, like many, prefer a combination of drive and distortion. The ModTone Dirty Duo is my go to pedal for this. http://www.modtone.net/ #3 Delay: This is an absolute essential pedal for adding spacious texture to solos, and if I bend out of tune you won’t notice it too much. #4 Wah: This one is too fun to leave at home. When my brain goes dead and my solos suck, this can make it seem not so bad. #5 Compressor: This one isn’t for everyone, but I never turn mine off. It’s not so much the compression that I’m after but I love the percussive attack and sustain it adds to notes when I am playing clean or when I’m “Chicken Pickin”. If you are doing country covers you will want this one with you. Please feel free to comment on your favorite 5. And when in doubt remember, “Get 2 of each!” Here is a typical question we have been asked many times “Since true bypass is touted as such a prestigious feature by so many pedal manufacturers, Shouldn’t I assume that it is better than non-true by pass pedals? And Shouldn’t I assume that my signal will be unaffected, clear and pristine if I use only True bypass pedals? Well, no, you should not.
To grasp an easy understanding, consider this; your guitar signal is high impedance and what that means is that as your guitar signal travels through a cable that it will begin to degrade after a length of about 16-18 feet, with or without pedals in your signal path! This is usually evident in a drop off of high frequencies. A simple test you can do yourself is to compare your guitar straight to your amp (no pedals) with a 6ft cable then compare with a 20ft cable, you should be able to hear a difference. This is because the capacitance load increases as the cable length increases. Thus, less cable, better signal. Now consider this, every time you add a pedal and patch cable to your signal path you are increasing the distance your signal travels, so in this case, true by pass or not, your signal suffers. With just 4 pedals using 6”- patch cables you have added 18” of cable or 3 feet with 8 pedals! This can be combated two ways, if you do own all true bypass pedals, you can add a buffer that will boost and restore your signal. The ModTone MT-SB Signal booster which offers other benefits would be a great choice. Some pedals (like Boss) which aren’t true bypass, have built in buffers that boost the signal automatically. A point to make here however are that not pedals, true bypass or other, are created equal. There are of course other factors that can affect your signal. The quality of the effects used for instance. It has also been my personal observation that some pedals of seemingly equal quality and features work better than others in my signal chain. Some pedals seem to "like" each other" some dont. For this reason I do not take anything for granted involving my signal. I have found that only by careful selection and trial and error could I have arrived at my current pedal line up which consist of both true by-pass and non-true bypass pedals. Ultimately our best advice is, test some gear and trust your ear. For those of you who practice your instrument alone, or maybe don’t have time or the inclination to practice with a band, you should consider practicing with Backing Tracks. If you are learning Licks (and I use the term generically for all instruments) nothing will help you cement them into your repertoire like playing against a track. Another major benefit will be to your timing. If you are learning cover songs, Back Tracks are as good as a band, they really help you get into the DNA of the song. I might add to that as long as my computer boots up, the band members are never late and there is no baggage.
#1 Know where to get the tracks: Finding tracks is easy, they sell them in most music stores Via CD hardcopies, ITunes has many ready to for you to download and there is an unlimited supply of pay for and FREE tracks for you on youtube. Here is an awesome site that is 100% free! http://www.guitarbackingtrack.com/ #2 Know your format choice in advance: Some sites give you a choice to leave out vocals or certain instrumentation. I play guitar and sing so I want mine minus the lead guitar and lead vocals. When downloading, try many formats. My son plays bass, usually I get a version with bass and without for when he visits! #3 Try some Karaoke Sites: Sometimes the best tracks are available as Karaoke tracks. When I have to play a song in a different key I can’t always readily find a track in my key. Here is a site that will let you create your own mix, which instruments go, stay, etc and what key you want it in. http://www.karaoke-version.com/ Be aware that this one is a pay site but it’s very cool. #4 Record yourself: The best way to track your progress, especially if you are learning solos , is to record yourself with a back track. Listen today, then listen each week or so and compare your progress. #5 Set yourself up for success: Try to create a space where your instruments, computer, audio equipment etc is close at hand and hopefully in a place you won’t be distracted. My space is a bedroom at the opposite end of the hallway from my bedroom. As long as both bedrooms doors are closed my wife can’t hear it. For me that is important because I usually practice at 4:00AM before I go to the GYM. Remember the term “Wood Shedding?” Well if you got one… |
Modtone Effects
|
 RSS Feed